


Home chefs often make the mistake of filling their kitchens with the latest tech gadgets and “As Seen on TV” offerings. In reality, all that’s needed to make restaurant-quality food at home are a few choice, precision tools — many of which are often overlooked. Sometimes the simplest tool in the kitchen can mean the difference between success and failure and edible and inedible. To find out what every home chef should have, we asked Chef Jessica Comegys which kitchen tools she can’t live without.
My biggest advice is to find a few things that help make your recipes flow easier and not to clutter your drawer with one-use tools. Cooking at home for your family can change your life for the better, not only because of the quality ingredients, but the positive energy and love that you put into the meals you prepare.
Spending time bonding over food is an age-old tradition that breaks the lines of cultures and it is the best love we can give.
Cutting Board
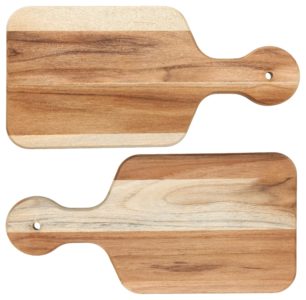
A giant cutting board is a must. I have two, a wooden one for veggies and baking, and a plastic one for meats and fish. Expert tip: Put a damp towel underneath to prevent sliding.
Kitchen Shears
 A sharp, heavy-duty pair of scissors can do pretty much anything from chopping delicate herbs to breaking down a whole chicken.
Mandoline
 The best way to get thin, consistent slices and to easily julienne.
Stand Mixer
 KitchenAid first came on the scene in 1919, and is still the best. I’ve had mine for going on 20 years with no maintenance (knock on wood!). The 5-quart bowl version is big enough for most home recipes without taking up too much counter space, plus a tilting head to allow for easy bowl access. Optional attachments do everything from grinding meat to juicing citrus fruits.
Chef’s Knife
 If I had to pick just one size, it would be the versatile 8-inch, equally useful for precision dicing and heavy-duty chopping. The rounded blade gives it a rocking motion to slice and dice with precision.
Microplane/Grater
 This is a great way to add citrus zest to get a flavor punch and I even use it to finely grate garlic pods and ginger. Bonus: It also makes snow-like cheese gratings! This is my No. 1 recommended tool!
Instant Pot
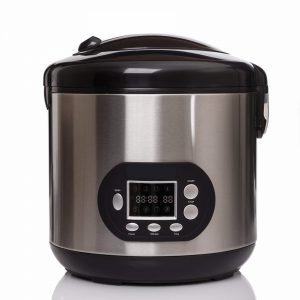
Every bride’s dream gift (well, maybe, if you ask me!) The modern version of the pressure cooker is the best thing since sliced bread. It can make a big roast fork tender in under two hours; it can cook rice, make yogurt, sauté… the possibilities are endless.
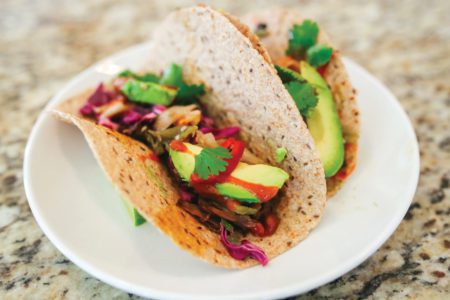
Instant Pot Korean Beef Tacos
For the Korean Beef:
1 fresh pear (rough chopped)
1 two-inch knob of fresh ginger (peeled)
4 cloves garlic
½ cup coconut aminos (soy sauce replacement)
½ cup coconut sugar
1 tsp sesame oil
2 lbs. top sirloin (see notes)For the Tacos:
chopped cilantro
chopped peanuts
kimchi (probiotic slaw found at gourmet grocery or slaw of some sort)
sriracha mayo
sprouted whole grain tortillasMake the sauce: Pulse pear, ginger, garlic, coconut aminos, and sugar until mostly smooth. Reserve half for later use (see notes).
Cook the meat: Trim any fat off the meat and cut into a few large chunks (it will shred, but cutting the meat helps it cook faster). Place in an Instant Pot and cover with half of the sauce. Cook on high pressure (manual) for 45 minutes.
Release steam and shred the meat in the Instant Pot with two forks.
Tacos: Fill each tortilla with beef, cilantro, peanuts, kimchi, and spicy mayo.
Notes:
Cuts of Meat: Chuck roast can work, but I found that even with some trimming, it still had too much fat for my liking. Top sirloin is a little more pricey, but I love it in this recipe because there is less fat to work around.Marinating: If you have time to marinate the meat, DO IT. It really enhances the flavor to of the meat to let it all kinda hang out together with the sauce for a while. If you don’t have time, no biggie. I usually don’t have time either!
Prep Time: 15 mins Cook Time: 45 mins Total Time: 1 hour
 Instant Pot Korean Beef Tacos
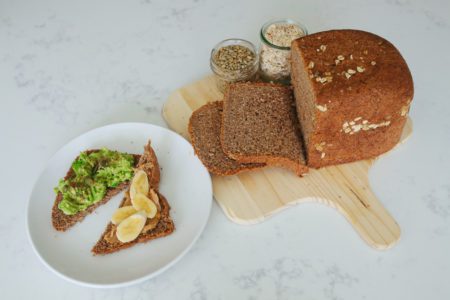
Bread Making Machine
Speaking of “sliced bread,” you’ve all heard your grandmother talk about having a bread machine but sold it in a garage sale…. you know the story. But the bread machine is making a comeback as people are becoming more conscious about what they feed themselves and their families.
Making bread from scratch, as any home cooking, allows you to control the ingredients. Take a look at the recipe we’ve included and note how many items are on the list. Seven good for you ingredients, plus optional nuts and seeds. Now take a look at the list on the back of the bread you purchased at the store. A lot more, right? Even some you can’t pronounce. With the “throw it all in” easy recipes for bread machines, it’s hard to make an excuse not to use it!
Bread Machine Bread
1 ¼ cups lukewarm water
2 tablespoons olive oil or vegetable oil
¼ cup honey or maple syrup
2 cups whole wheat flour
1 ½ cups all purpose flour
¼ cup sunflower, sesame or flax seeds, or a combination, optional
1 tablespoon vital wheat gluten, optional; for higher rise
1 ½ teaspoons salt
1 ½ teaspoons instant yeast
Sprinkle of old fashion oats for the last rise cycle, optionalTo make bread in a bread machine: Put all of the ingredients into the bread pan in the order listed.
Program for basic white bread (or for whole wheat bread, if your machine has a whole wheat setting), and press start.
Remove the bread from the machine when it’s done. Either turn it out of the pan onto a rack to cool; or turn it out of the pan, place it back in the machine (atop the structure that holds the pan), crack the lid open about 1”, and let it cool right in the cooling-down machine. This helps prevent the crust from wrinkling as the loaf cools.
It shouldn’t be hard adapting this loaf to your own bread machine; all you need to know is what proportion of flour/liquid/yeast your machine functions best with. Take a look at the dough after it’s kneaded for about 10 to 12 minutes or so; it should be smooth, not sticky (too little flour) or lumpy (too little liquid), forming a nice ball. If the dough looks good at this point, you’re probably all set.
What to Look For When Buying Beef
Tips from our Hostess with the Mostess
 The term “grass fed” beef has become increasingly popular in the last few years with beef industry marketing. The “grass fed” label is stamped on almost every beef label in hopes to invoke mental images of cows grazing in green pastures. However, the term has become so overused with zero standards of truth, “grass fed” labeling is essentially meaningless. In contrast “grass finished” is what you should be looking for. Grass finished beef is from cows who spent their entire lives in the pasture and were given more time to mature naturally. Labels can be tricky! Make sure you pick “grass finished” for optimum taste and health benefits.