


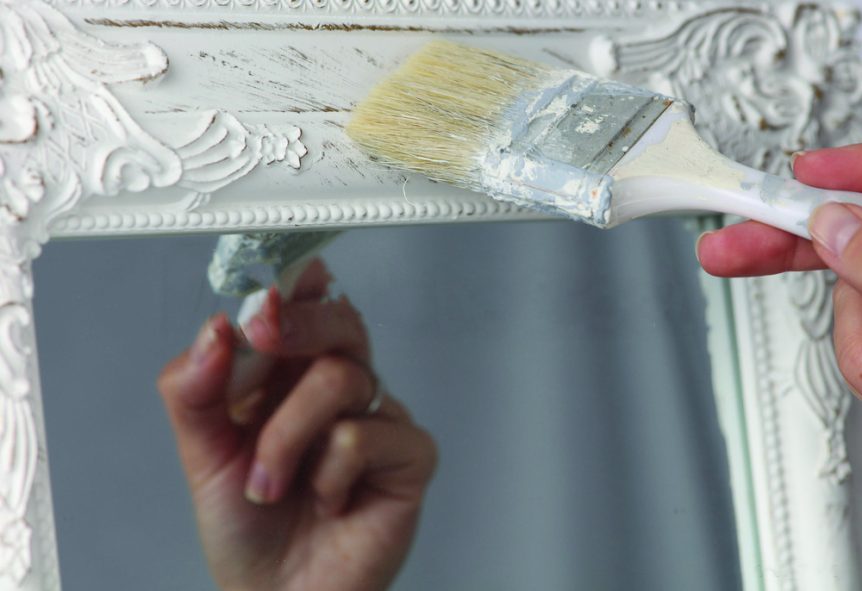
For me, being cooped up has led to many “projects” around the house. Some I did well and some I did to just complete and move on. The project I choose now is in response to how I have been feeling these past few months. The time at home has led to time to reflect. What better way to reflect than in an old mirror that needs a little TLC?
Mirrors play various roles in our homes. They can make a space feel larger, bring light into a once-dark space, or add interest to a wall that lacked a focal point. Because mirrors come in a variety of sizes, they can be used in almost any space. A few challenges to finding the perfect mirror are choosing the right size, shape and, don’t forget, the price. I found an old ornate framed mirror that was begging for a makeover. It seemed to be the perfect choice since we are all a little weathered and needing a makeover.
The materials I need to gather included: Microfiber cloth, painters tape, newspaper, sandpaper, spray primer and spray paint.
This painting project works best on wood, metal and laminate frames. Spray paint will help ensure the finish is as smooth as possible. If you want a more weathered or worn look, use a brush to show brush strokes and marks (adds a personal touch and helps me not stress about perfection).
Preparation:
You need to prepare the surface of the frame before you jump straight into painting. The frame needs to be clean and residue-free. If it’s an old mirror like mine, be sure to really clean off the cobwebs and be diligent. Using a microfiber cloth (it helps to trap dust particles), wipe down the entire frame; get in those nooks and crannies. Vinegar usually gets any sticky spots clean.
Remove embellishments or hardware (hooks, hinges, plating) that you do not want painted.
Sand down the top layer of the finish or paint with a fine grit sandpaper. Be gentle; you just need to rough it up a little so the paint will adhere to it. **NOTE – if you skip this step, the paint can peel, chip or crack in a very short time.
After sanding, wipe down the frame again, removing any dust.
Before priming and paint, measure and cut a piece of newspaper (no one enjoys reading it these days) to fit over the mirror glass. Use painters tape to attach the paper to the mirror. You don’t want any tape touching the frame. ** Any gap in coverage may very well end up covered in paint or primer.
Prime & Paint:
Apply spray primer in thin, even strokes. Apply two coats of primer, allowing for dry time in between (refer to the instructions for dry time).
After applying both coats, let your frame sit and dry for a few hours or overnight. Once the primer is completely dry, gently sand the frame with fine grit sandpaper. Don’t sand away the primer; just eliminate ay stuck on particles. Wipe down the frame to remove any dust.
Apply the paint in even, thin strokes. Use two coats of your desired paint color, letting each coat dry completely before applying the next.
Before the paint dries and without touching the edges of the frame, remove the painter’s tape from around the edges of the frame. Be sure to hold the newspaper so that it does not fall and touch the wet frame. *** Don’t wait until the paint dries because it can adhere to the tape and then pull a chunk of paint off of the frame. Pull the tape off at an angle and away from the surface to ensure a clean line.
Once it is fully dry, reattach any hardware and your brand new-looking mirror is ready to be displayed.
Like this mirror, I think we all need to have a dusting off and recoat to feel a little back to normal. Whenever I can get my hands on a project and see it through, I always feel better about the time spent. Constructive time creating lends to a positive attitude and internal growth unmatched by other chores. Take time out to work on something you have been passing by and avoiding. Check it off your list and enjoy the fruits of your labor. DIY doesn’t have to be difficult. After all, it’s just paint.
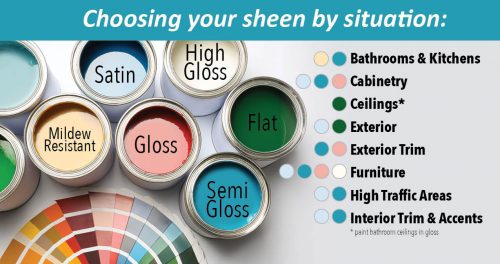
Sheen Cheat Sheet
A breakdown of the sheen spectrum from flat to gloss
From flat and matte to eggshell, satin, semi and gloss, it can be hard to know which sheen will work best for your space. Check out the sheen chart below to get the details on each option and see which one sounds like the perfect fit for your project.
FLAT: Low sheen with a non-reflective finish. Ideal for very low-traffic areas and ceilings. Although I have had to wipe off spaghetti and other UFOs (unknown foreign objects) from my ceilings, I cannot think a better place for a flat sheen.
MATTE: Low-luster finish, relatively durable, easy to clean and hides minor surface imperfections well. However, some manufacturers have developed matte finish products with durability equal to that of eggshell. Hides “minor” imperfections does not include hover board bumps, basketball imprints (I said no balls in the house), or dirty fingerprints.
Moderate sheens, like eggshell, satin and higher sheens such as semi-gloss and gloss, however, can stand a lot of abuse, so they are great for busy areas.
EGGSHELL: Has a soft, smooth appearance, very much like its namesake, an eggshell; slightly reflective. It’s a moderately durable sheen and is a safe choice for most types of walls in your home. If you are designing baby Love’s sanctuary before her precious arrival, don’t make hasty decisions; chose at least eggshell in case you need to wipe off lotion or diaper cream and tiny little fingerprints.
SATIN: Has a lustrous finish, and is a good option for high-traffic areas due to its durability. It can also stand some exposure to moisture. While in the playroom as you are frantically scrubbing the beautiful art that sweet Baby Boo just made for you, you’ll be glad you chose a higher sheen like satin.
SEMI-GLOSS: Super sleek, shiny appearance, and best for high-traffic areas and spots that get touched or bumped a lot, such as doors and trim. If your kitchen gets lots of use (I try to stay out of there) and cabinets are close to your iron skillet with fried pork chops, you should definitely consider a higher sheen. Semi-gloss is definitely easier to clean.
GLOSS: Creates a bright, ultra-shiny and reflective finish that almost resembles glass. Suitable for surfaces in high-use environments. Some say reflective glass, some say mirrored; Bless it – that will not be in my bedroom but it may be a great choice for a vanity chair or side table. How bold are you?
One more tip to consider: Lower sheen paints soak up light, which helps hide imperfections, and gloss sheens do the opposite, reflecting light to make darker rooms feel brighter and lighter and emphasizing imperfections.